12. Using external data
Adding external (auxiliary) data can be usefully if you want to combine your existing gamma spectral data with other information. For instance if you have a file with elevations in an airborne survey, or a file with cable lengths in a seaborne work.
Key to the matching of external data to the gammaray survey data already in GAMMAN, is to have a matching "key", i.e. a field in your dataset that s also present in the survey data. In most cases, a timestamp will be used to match external data to the GAMMAN data, but other fields can be used too. Sometimes people use a GPS X or Y position to match data instead of time.
12.1 The use of timestamps
In Gamman you can import such data and connect or tie the data to the spectral data in your survey. To be able to tie your external data to the gamma spectra, the external data needs to have a timestamp which has the same format as the time stamps that are used in Gamman.
Timestamps in Gamman are stored as floating-point numbers, in the so-called OLE2.0 standard that is also used in Windows and Excel. The integer part of the number is the "date" part and denotes the number of days since 30 dec 1899. The fractional part denotes the "time" part and equals the number of seconds in a day.
The integral part of a Gamman Timestamp is the number of days that have passed since 12/30/1899. The fractional part of the timestamp is the fraction of a 24 hour day that has elapsed. Following are some examples of Timestamp values and their corresponding dates and times:
0 | 30 Dec1899 0:00 |
2.75 | 1 Jan 1900 18:00 |
43396.57335 | 23 Okt 2018 13:45:37 |
12.2 Converting time stamps into the Gamman format
Converting timestamps can easily be done in Excel or Numbers. Take for instance the following snippet:

Above you see a column Date and Time. The column GammanTime is simply the sum of the two (D = B + C). To see what happens, switch the column layout of cols B and C to "number" instead of Date or Time:

Now you see the numeric representation of the dates and times in your data, and it becomes clear that by adding date and time, you get to the GammanDateTime and your file is ready to import.
12.3 Importing your data
The wizard can be found in the File menu click Tools | Import Aux Data. A new window will show up, click Next to start importing your data.
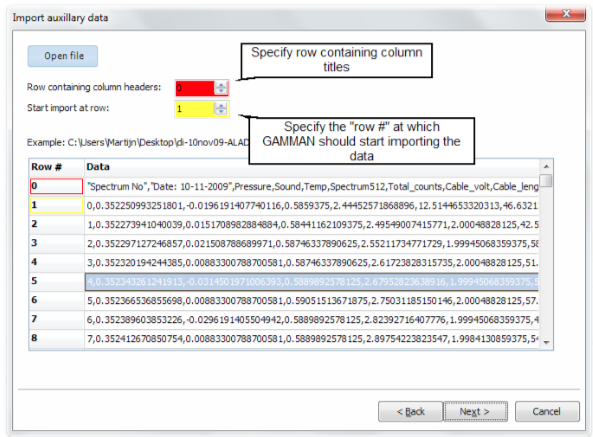
Before starting the wizard make sure your file contains a row with the column headers, this will help identifying your data. The data should be ASCII file format, for example CSV or TXT.
Make sure one of the columns has timestamps in the same format as used by GAMMAN - as described above. And make sure your timestamps are referencing the same time region.
The first step is to specify file you want to import. Next define the row containing the titles from the additional data file (red) and the start row at which the importation process should start (yellow). Click Next to continue.

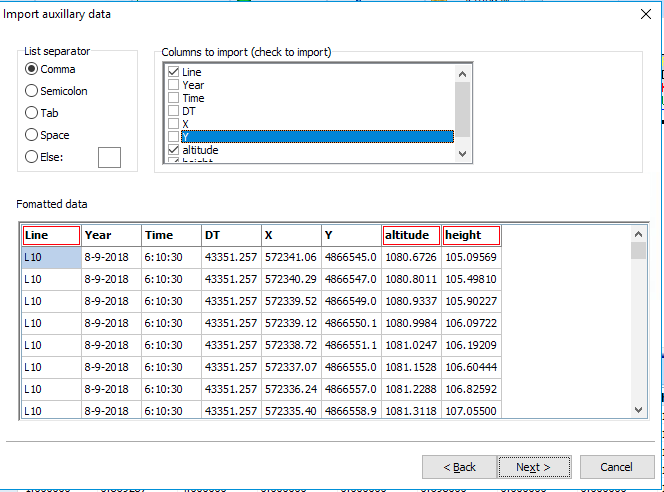
Next a window will show up where you can specify the list separator used in the additional dataset. Check the column(s) you wish to import from your dataset from the list, the selected columns will be marked in the 'formatted data' textbox.

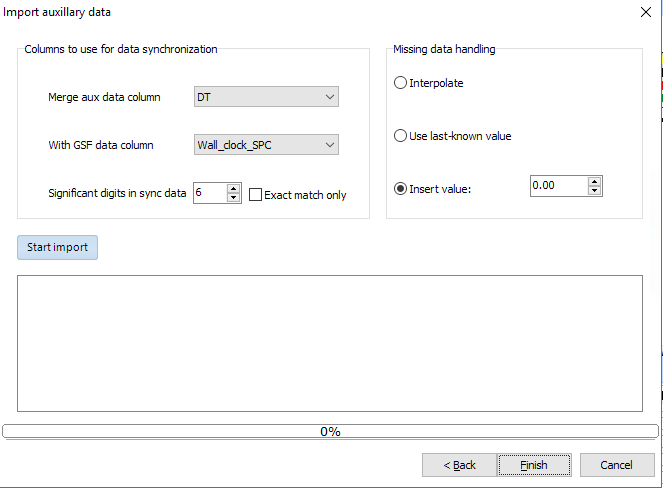
Finally set the linking column (i.e. a column containing shared timestamps or other key data that is present in both datasets) and choose which method you would like to use to replace any records that are not present or missing in the external dataset. The "significant digits" field is present to determine the accuracy of the data matching algorithm. For instance, if you would use zero significant digits to match data based on timestamps, then the finder algorithm would match dates only! If one would rather use 3 significant digits, then timefields would match to a precision of about 90 seconds. The table below lists some examples:
Sig digits Date/time resolution 0 1 day 1 9000s 2 900s 3 90s 4 9s 5 .9s
The "missing data handling" box allows to choose what to do if a record in the GAMMAN data does not have a matching record in the external data. This can happen if your survey data has been acquired with a higher pace that the external data. The option "Interpolate" will apply a linear interpolation technique to calculate a missing value; "Use last known value" uses the last value that was inserted and and "insert value" will use a fixed number to fill an empty record.
- Finally choose Finish to start the import process. The data that is imported will be pasted to the end of the raw data spreadsheet.
