
Samples
Samples are essential to gamma-ray surveys that correlate soil parameters to radionuclide concentrations. Several examples are given on the application page. The application models are described, and several case studies show how soil samples connect soil parameters and radionuclide concentrations.
The soil samples used in the application models and case studies are retrieved from the field and analyzed in the laboratory for various soil parameters.
Determining the locations where soil samples are taken is an essential step in the process. The soil samples should represent the variation found in the surveyed field. In addition, it is possible to measure the radionuclide concentrations in the field at the locations where samples are taken. This step can be done to compare the radionuclide concentrations in the field with those measured in the laboratory. Or it can skip the laboratory determination of radionuclide concentrations altogether.
Find Sample locations
The Find Sample locations panel can be opened using the Find Sample locations entry in the Actions menu or by clicking the magnifier button in the toolbar. In this panel, suggested sample locations can be calculated, old sample locations can be deleted, and the visibility of sample locations on the map can be toggled.
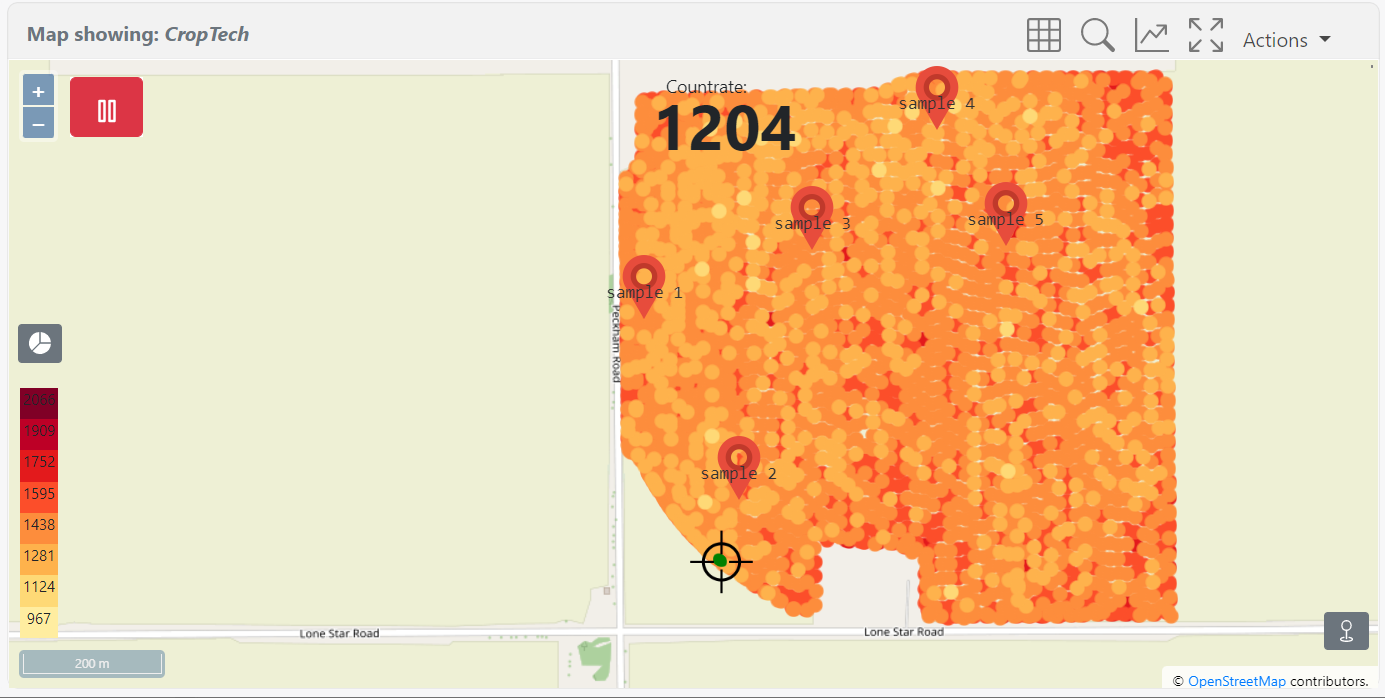
Locations are suggested points for taking soil samples. An algorithm calculates a range of values representing the range between the minimum and maximum values within the field while maximizing the differences in spatial locations. The results are sample locations that are a good representation of the variation within the field.
Open Locations toolbar

The locations tab can toggle the visibility on the map, delete and find locations. The Find locations button will open the panel shown in the figure.
The Delete locations will delete all locations present in the project. Since the sample locations are calculated based on the data in the view, deleting and recalculating the suggested sample locations might be desirable when new data has been collected.
Find locations pop-up
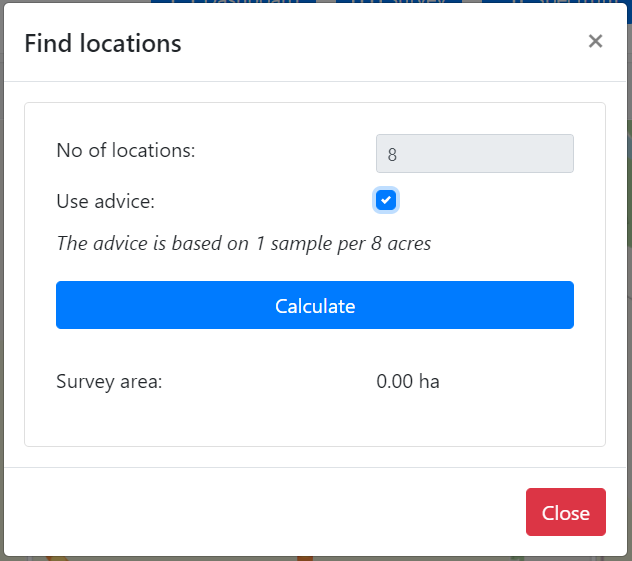
The find locations pop-up will load all the data collected in the current view and use this data to calculate positions that reflect the variation in the field. The use advice option uses the area of the surveyed area to suggest several sample locations. After calculation, the locations are stored within the project. These will be included in a separate file when downloading the project. When reloading the map page, these locations will be plotted on the map.
Note: The current view is used to calculate the suggested sample locations. This feature can be used to determine sample locations in a specific part of the field by zooming in on this section.
Z-parameter
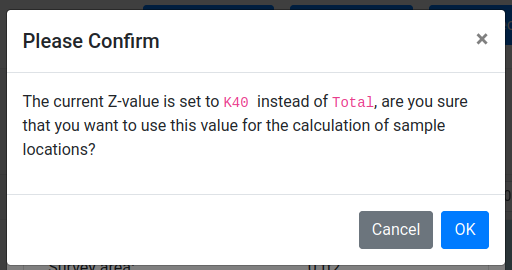
Note: on the survey page, the z-parameter Total is used to calculate the suggested sample locations. It is possible to change this z-parameter by calculating the sample locations on the project page.
The parameter used to calculate the sample locations is determined by the z-value selected in the map viewer. Usually, for the determination of the sample point, the total value is used. If anything other than Total is selected, the shown pop-up will ask for confirmation.
Measure sample(s)
By using the Measure sample(s) entry in the Actions menu or by clicking on the graph button in the toolbar, the Measure sample(s) panel can be opened. Samples can be measured regardless of the presence of suggested sample locations. Samples are collected by standing still for a predefined ( default 60 seconds) period. The incoming spectra are summed and subsequently analyzed. The latest GPS position is attached to this summed spectrum.
Open Samples toolbar
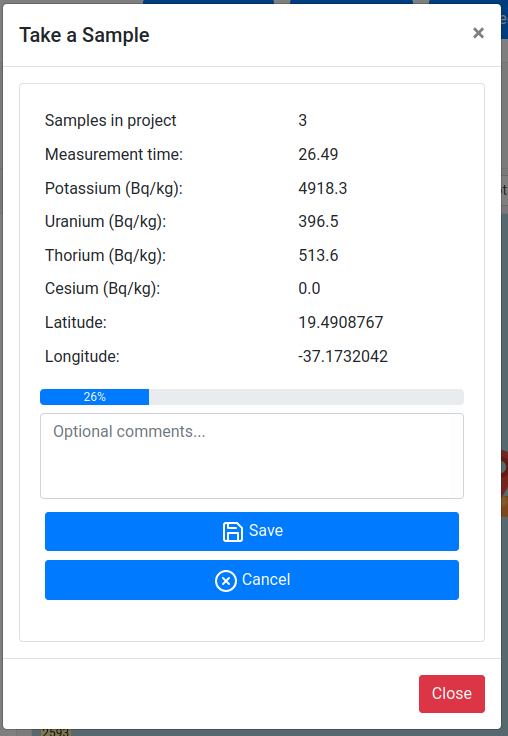
The Samples tab can toggle the sample visibility on the map, delete and take samples. The Take a sample button will open the panel below.
The Delete samples button will delete all samples present in the project. Individual samples can be deleted by using the sample table.
Sample measurement pop-up
The sample-taking pop-up can be used to start and finalize taking a sample. In addition, comments can be added to each sample.
The last known GPS position will be added to the sample.
Note: The sample-taking window can be closed while a sample is being taken. When a sample is taken, this pop-up will automatically be opened when navigating to the survey or project page.
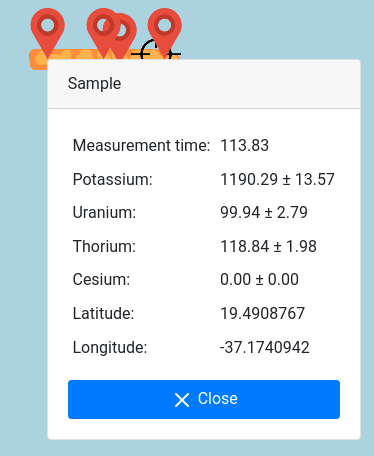
Inspection of sample measurement
By clicking on a sample marker, the sample data can be inspected.
Recorded sample table
The recorded samples table can be found at the bottom of the projects page. In this table, the individual samples can be inspected and deleted.
The samples can be downloaded (CSV or JSON format). The samples are always included in a full project download.
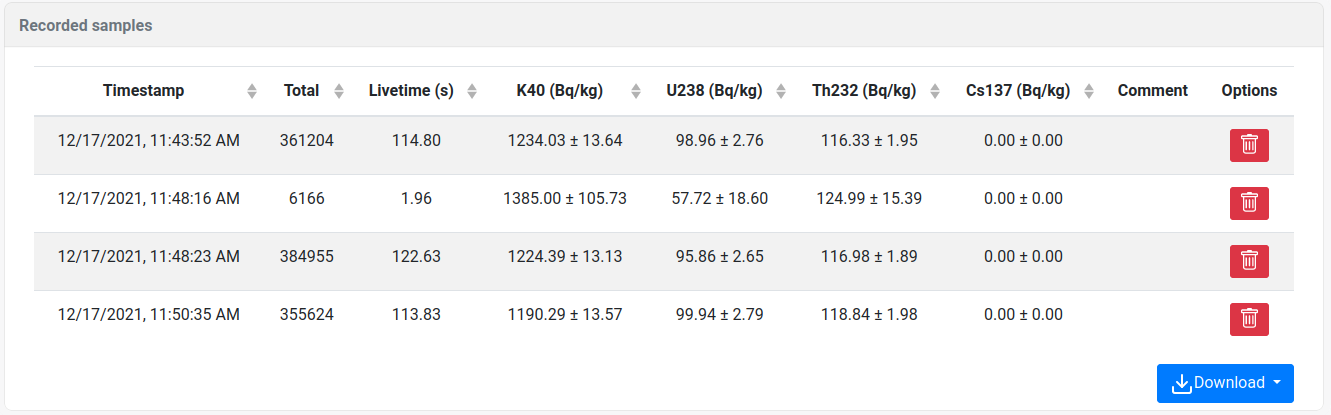
Note: A sample record contains an energy stabilized and analyzed spectrum. Because this record does not contain the raw spectrum it cannot be loaded and re-analyzed by Gamman.